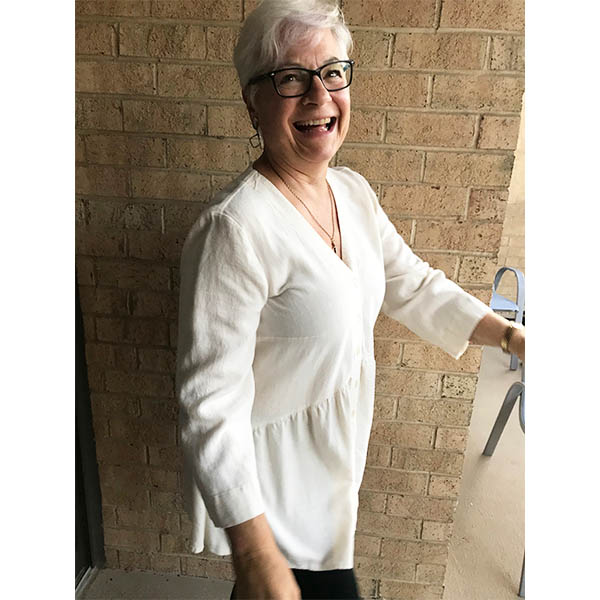
We have all been loving the new colors of silky noil we have at the shop right now – all twenty one of them! This fabric is a viscose (rayon) and linen blend with a soft, subtle texture, making it the perfect substrate for summer garments like this floaty blouse Mary whipped up recently. Fabrics with a lot of drape can sometimes be tricky to sew, but Mary has provided lots of helpful tips (and a video!) for working with shifty fabrics.
Maker: Mary
Pattern Used:

The Jules Woven Tunic from Style Arc. A great casual to work piece. Features a V neckline and front button opening and 7/8 length sleeves (also known as bracelet length). Slightly gathered skirt/peplum falls softly from a shaped under bust seam.
Fabric Used:

Silky Noil (70% viscose/30% linen) in the color Ivory and vintage shell buttons from my mother’s button box, but we have lots of wonderful buttons at Stitch.
Did you make a muslin? Did you make any alterations to the pattern?
I chose my size based on my upper bust measurement so that I would get a good fit through the neck and shoulders. Comparing the size chart with the finished measurements, I determined there is about 3” ease through the bust
I knew I would need to do a FBA to maintain the 3” ease . Also, I prefer a small side dart because I find the fabric falls more gracefully from the bust apex. Otherwise it seems to wing out and make the front of the garment stick out.

I made my trusty muslin! Shoulders and neck fit well, I needed to move the bust dart up ½” and I thought the width at the waist was a bit wide for me, so I shaved off 1” front and back at the side seams of the skirt and the bodice going from nothing at the under arms to 1” at the waist. I liked the fit better on me. Ah, the benefits of a muslin!
Do you have any tips for construction?
I love, love, love this fabric! It is so soft, a bit spongey (it has a little give), drapey and very comfy. As with all drapey, soft fabrics, it can be a bit of a challenge to sew (but so worth it).
SOOO, a few tips to encourage you to try these luscious fabrics.
I have found the most important thing for success in sewing soft, drapey fabrics is to cut the fabric on grain. The more accurate you are here the better the garment will lay and construction is easier because it doesn’t stretch in weird ways.
First, straighten the crosswise grain. You can do this by making a small snip (1” or so) and quickly tear across the crosswise grain. This is a good method for rayon challis, light weight silks (charmeuse, chiffon, georgette), light cottons (quilting weight, lawn, voile). Test first and if you meet a lot of resistance, use the next method.
“Follow the thread across the grain” is the other method I use to straighten the crosswise grain. This is great for linens, wools, and heavier fabrics with a strong lengthwise weave (it doesn’t want to tear). I pull a thread along the crosswise weave – it will make the thread more visible or pucker the fabric along the thread. I will cut along the thread and continue to pull the thread and cut until I cut all the way across the fabric. Do both cut edges of the fabric. (I am often surprised how off grain fabric can be. Purchase ¼ yard extra of your fabric to avoid any sad surprises.)
Here is a video Mary made to show this second method for straightening the crosswise grain: Straightening the Grain
If the fabric is less than 2 yards in length, I serge (or zigzag) the edges and wash and dry the fabric as it will be laundered after completed. If it is more than 2 yards I serge the two crosswise edges together. This keeps it from twisting around itself and distorting even more in the washer and dryer. Usually by doing this I find the fabric grain will even out. Remove the serging and carefully press the fabric if necessary.
I cut the silky noil fabric out in a single layer, lining the crosswise and lengthwise (selvage) along the edge of my cutting mat. I used weights and a rotary cutter to avoid distorting the fabric with pins and scissors. Because the facings were rather narrow, I reserved a block of fabric big enough to fit the facings and fused the interfacing to that block before I cut out the pattern pieces. (This is called block fusing.)
When sewing loosely woven fabrics, always staystitch before doing any sewing. I staystitched the front “V” neckline at a scant seam allowance starting at the lower neckline and sewing to the shoulder so it wouldn’t stretch. The back neckline I stay stitched from the shoulder to the center back, flipped the fabric over and did the other side from the shoulder to the center back.
You could use French seams with a lighter weight fabric, but the Silky Noil was too thick. I sewed with a stitch length of 2.2 and then used the four-thread setting on my serger to finish the seams. I didn’t want the seams to unravel over time.
I changed the order of sewing given in the pattern instruction. I sewed the shoulder seams and side seams of the bodice first. Next, I sewed the side seams of the skirt and made the gathering stitches. Then I sewed the skirt to the bodice – I like a continuous clean line going around the skirt seam. I often will press my gathers flat after I pin them to help them behave when I am sewing . They don’t tend to creep and shift that way and I don’t need as many pins. Then I sewed the facing and hem, followed by the sleeves.

Would you make it again?
This was a delightful make. I liked the pattern from the moment I saw it and I knew exactly the fabric I wanted to use. Though a bit of a challenge, I enjoyed the process and allowed myself to savor the texture and softness of the fabric as I was sewing. This tunic is so comfortable and stylish. I can imagine it in one of our lovely rayon challis, maybe even lengthened for a dress.


Stitch Samples is a blog series that gives you a closer look at the samples made by members of our shop gang.


